MENU

Resin Bound Gravel Installation Guide

What is PermaPave?

One of the first established multi-discipline brands in the UK resin bound gravel market, PermaPave pulls together the most popular and best quality products to provide an offering unlike any other.

We pride ourselves on the supply of high-quality aggregates, polyurethane resin binders, tools, machinery and accessories, all at highly competitive prices.

Our brands and partners are some of the best names and most renowned manufacturers in the industry and are known worldwide.

We bring these top brands together, making them available to you all in one place!

What is Resin Bound Gravel?

Resin bound gravel is a type of surfacing where the installer mixes a quantity of washed and kiln-dried decorative aggregate with a specially formulated polyurethane-based resin binder to create a highly attractive and fully permeable, strong stone surface. This type of surfacing is now growing massively in popularity due to it’s high weight-bearing properties, durability, permeability and low-maintenance nature.

Once laid it does not migrate like loose gravel, and does not require re-dressing with sand unlike block paving. As the gravel is “locked-in” by the binder, the surface looks as good as the day it was laid, for many years after its installation.

As the surface is porous and allows water to pass through it and, in turn, soak into the ground, it is fully SUDS compliant. This means that you are likely to have little or no issue with planning permission if looking to rejuvenate an existing block-paved, tarmac or concrete driveway.

Unlike resin bonded gravel, in which the resin is poured and spread with a squeegee and the gravel scattered across the surface, the surface is unlikely to erode as all of the gravel is encased in resin, effectively giving a flat and even surface. This surface can be made to be anti-slip by the inclusion of a Chelford-52 sand or crushed glass used either in the mix with the gravel and resin, or scattered over the surface during the curing period, which helps to add a rougher texture to the upper surface, increasing grip for tyres and pedestrians.

How is it supplied?

Our kits are expertly designed to offer installers the absolute best in the industry. By pairing our double strength aliphatic resin with superior washed and
kiln-dried aggregates, installers can be confident that their job will proceed with the same level of quality, every time.

Each colour blend you have seen is available to order as simply aggregate alone, ready to be mixed with your choice of resin or as a resin bound kit, containing the washed and dried aggregates, our BBA approved double strength resin and kiln-dried sand.

Each kit contains

4x
25kg Daltex Gravel
1x
6.25kg Daltex C52 Sand
1x
7.5kg PermaBound UVR

How do I size my project?

There is no hard and fast, guaranteed way to calculate the precise amount of materials needed. The approximation for coverage of our standard resin bound gravel kits is around 3.55m² when laid at 18mm. Deviations in the surface texture and porosity can affect this figure and we recommend a 10% over-order (or contingency) to help protect against surface fluctuations.

We have created a resin bound gravel kit calculator which will help to work out how many kits you require to cover an area at various depths. You can find this on any of the resin bound gravel pages.

For more detailed spreading rates, see the technical information section further on this guide. To work out the number of required packs, divide the total area by the coverage of your selected kit at the required depth.

So for the example above, the 160m² driveway will require 46 packs as 160 ÷ 3.55 = 45.07 and the number has been rounded up to the nearest whole number.

Preparing the base for resin bound gravel

Preparing the surface ready to lay resin bound gravel on top, is probably the most important aspect of the whole project. If the gravel is laid onto an unprepared, damp, granular base, there is a great danger the surface will crack, the finish of the surface may have dark patches or spots, the resin may react with the moisture and begin to foam, to name just a few.

The importance of properly preparing the base and choosing the right weather conditions are absolutely paramount to the success of the install. By following some simple guidance as set out below, you can help to negate these potentially massively damaging issues during the installation process.

Existing surface removal

The first step towards creating a beautifully finished resin bound surface would be to remove any existing block-paving, concrete or tarmac surface.

If removing block paving from the area, the blocks may be recycled later by using the bricks as edging around the installation should this be a desirable style of edging.

If there is no existing surface in place, you may skip this process.

Excavating the area

Once the existing surface has been removed, the area should be carefully excavated to a depth which is appropriate for the type of installation carried out.

Advice should be sought on the required depth for your particular installation, taking into account the firmness of the ground and the total weight of traffic using the surface.

A recommended minimum depth would be to excavate to 220mm.

Install perimeter edging

Around the edges of the installation, an appropriate load bearing edging should be installed . We recommend products such as pre-cast concrete kerbstones, block-paving bricks or plastic lumber which do not rot over time and provide a solid edge around the installation.

These should be installed according to the relevant manufacturers instructions however if guidance is needed, please contact our helpful team who will happy to advise on other suitable products.

MoT Type 3 hardcore base

Once the perimeter edging has been installed properly and securely, then a base layer of MoT type 3 should be laid at the required depth. The minimum recommended depth of hardcore should be 150mm but this depends on a number of factors including sub-grade stability and intended use for the surface.

This layer of MoT should be compacted using a roller or vibro-plate (whacker) to ensure the base is consolidated. If you need advice regarding the sub-base thickness, please contact us.

Lay geotextile membrane

Once the MoT layer has been laid and compacted, then an appropriate permeable geotextile membrane should be spread across the top.

This membrane should be of a weight of no less than 110 grams per m2. Any joins should have a 100mm overlap and should be fixed into place with either plastic fixing pegs or galvanised steel U-Pins. This will ensure the optimal suppression of weeds as well as keeping the build-up layers separated and will negate sand wash-out.

Sand bedding layer

After the geotextile membrane layer has been laid and secured, a bedding layer of sharp sand should be laid at approximately 10mm in depth, the upper surface of which should be completely level and checked with a spirit measure.

This is not a fixed depth as this layer is intended to smooth out any undulation present in the hardcore layer, the depth may vary slightly.

This bedding layer can be lightly compacted using a whacker plate.

Laying a solid base

After the sand has been spread and compacted lightly, the area should be covered using a suitable ground reinforcement layer. This can be of a tarmac, concrete or X-Grid® ground reinforcement grid type.

We recommend the use of X-Grid® as there is no time wasted between laying the reinforcement layer and floating the resin as there is no curing needed unlike concrete or tarmac. Contact us for more details.

Tarmac should be laid at >50mm depth and concrete at >80mm depth.

X-Grid stone in-fill

If using X-Grid® as your reinforcement layer, the grid should be filled with chippings with a diameter of no larger than 20mm. Care should be taken to ensure that as much excess dust is removed from the stone as possible. Gravel requirement can be calculated by:

area x 72 = stone required in kg

Once evenly distributed across the whole X-Grid® layer, the limestone and grid should be lightly compacted using a light vibration plate (whacker) to ensure it is sufficiently bedded into the sharp sand and that the limestone fill is as level as possible.

Mixing resin bound binder & aggregates

Checking Materials

As there are several components required for a resin bound gravel installation, prior to commencing work on mixing the aggregate materials such as the decorative aggregates, the resin buckets and sand should all be split into complete mixes to save time and negate mistakes when adding the components to a mixer. Components should be separated and mixed to this formula:

75% 2-5mm Gravel + 25% 1-3mm Gravel OR 50% 2-5mm Gravel + 50% 1-3mm Gravel

An additional 5% coarse sand or crushed glass can optionally be added

By working in this way, you will have no surprises towards the end of your job as you’ve counted all the bags already and ensured they’re mixed to the correct formula.

All bags of aggregate should be stored in a dry location as any moisture within the aggregate will affect the overall finish of the resin and may cause instability.

Mixing the resin binder

When you are satisfied that all of the materials are present and sectioned into individual mixes, it’s time to start mixing the resin components. After opening the tubs containing both parts of the resin, mix the resins by pouring the part A component into the part B bucket and mix for around 30 seconds using a motorised paddle mixer until the mix turns to a creamy consistency. While the resin is mixing, we recommend adding the aggregate to the forced action mixer and allowing it to be mixed dry for 30-60 seconds to remove any dust which may have gathered on the aggregate. Be careful not to over-mix the resin and to mix each batch for the same period of time, using the same method to give the most consistent finish after the screed has cured.

Mixing the aggregate

Once the two-part resin has been mixed, ensure that all four bags of decorative gravel have been added to the forced action mixer and allowed to dry-mix for 30-60 seconds to remove any excess dust. With the mixer in operation, slowly add the complete bucket of mixed resin to the forced action mixer pan. Tip: If using a forced action mixer with a safety grille over the pan, try using a funnel to add the resin into the mixer to reduce the resin build up on the mixer. Once the complete bucket of resin has been added to the mixer, wait for 30 seconds and gradually add the full bag of sand to the mix. Take care not to add too much, too quickly as this can become clumpy and form “worm-casts” on the surface of the installation. By adding the sand to the mix, the surface will have a non-slip finish which will not squeak underfoot, as well as making the mix incredibly strong. The components should be combined in the mixer for around two minutes in total and normally has a consistency of porridge. Tip: To ensure the optimal finish and to avoid any surface texture differences, all batches should be mixed for the same amount of time.

Laying the mix

Once all the components have been mixed for the allotted time, empty the mixer pan into a series of buckets or, ideally, a wheelbarrow and tip onto the general area, working from the furthest edge backwards towards your exit. These piles can be roughly raked to distribute the mix before being trowelled down. Wipe a trowel with a suitable cleaning agent (often white spirit is used) which will stop the resin from sticking to the trowel. Using the tool, press down on the resin mixture, compacting it to the sub-base and spreading it to an even 18mm depth. Tip: The use of batons may help with the even distribution and to provide a consistent depth across the surface. For different depths and spreading rates, please see the table in the technical information section. The closest edge should be left fluffed up and uncompacted until the next mix is ready, to help with the seamless overlap of the two mixes it is possible that there will be darker lines as one mix has partially cured before the next has been laid next to it. Dependent on weather conditions, the resin mix starts to cure almost immediately and you will have around 20-30 minutes per mix to screed the resin to the required level. This may come down to 10 minutes during warm weather.

Additional Information

Curing times

The best conditions for an installation are a dry, mild, cloudy day where there is no threat of rain and the temperature is around 12-18oC such as we get in late spring, summer or early autumn. Under these conditions the screed will have a pot life of 20-30 minutes (non-UV) or 30-40 minutes (UV) and be cured/tack-free after 6 hours (non-UV) or 8-10 hours (UV). If the conditions are outside of these bounds, then considerations must be made. On a hot day, objects in direct sunlight can reach 50-60oC, causing the resin to cure much faster than usual. The ground temperature of the sub-base (e.g. black tarmac) can also absorb heat and cause the resin to cure much faster than usual. Resins and aggregates should be stored in a relatively cool and shaded location prior to laying on hot days to help keep curing times stable and workable. Similarly, in cold weather, the ground and air temperature will fall and resin curing times will lengthen significantly and in the case of UV-stable resin, may not cure at all until the temperature of the laid mix reaches a minimum of 5oC.

UV Stable vs Non-UV

There are two main types of polyurethane resin which are used for resin bound surfacing. The two are known by a variety of different names such as: standard, UVR, aliphatic, aromatic, UV stable, non-stable and other manufacturer specific names. The differences between the two are as follows: Non-UV Stable (aka aromatic, standard resin) is the least expensive resin which has a slightly more yellow tone and gives a honey-like tint to the aggregate with which it is mixed and will slightly yellow over time with the effects of UV rays from daylight. UV-Stable (aka aliphatic, UVR) is a premium resin which is clear and resistant to the effects of UV rays from daylight. This should be used in situations where the natural colour of the aggregate is to be retained or to negate the honey tones produced by gravel mixed using a standard aromatic resin.
Curing time table

Technical Information

Spreading rates

Depending on the intended purpose for the surface, the top resin bound layer depth can be adjusted, meaning each pack can cover a different surface area depending on the thickness. For an approximate guideline on the required thickness, please see the table “Spreading Rates”.

Laying conditions

There are two main types of polyurethane resin which are used for resin bound surfacing. The two are known by a variety of different names such as: standard, UVR, aliphatic, aromatic, UV stable, non-stable and other manufacturer specific names. The differences between the two are as follows: Non-UV Stable (aka aromatic, standard resin) is the least expensive resin which has a slightly more yellow tone and gives a honey-like tint to the aggregate with which it is mixed and will slightly yellow over time with the effects of UV rays from daylight. UV-Stable (aka aliphatic, UVR) is a premium resin which is clear and resistant to the effects of UV rays from daylight. This should be used in situations where the natural colour of the aggregate is to be retained or to negate the honey tones produced by gravel mixed using a standard aromatic resin.

Sub-grade Strength/Ground Condition

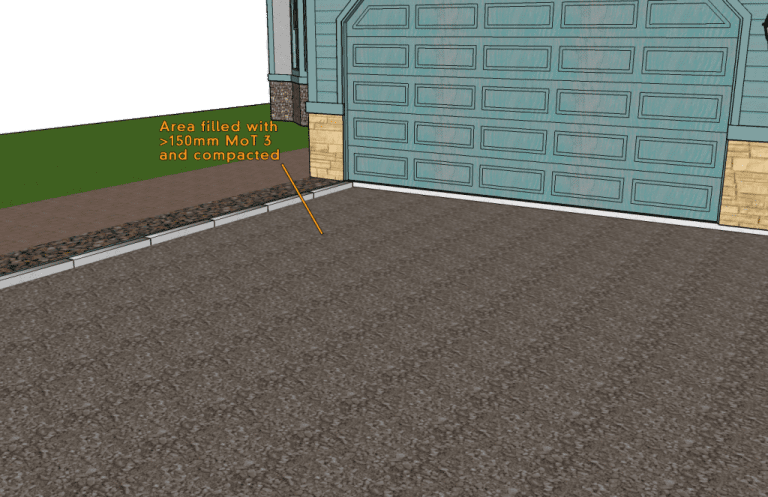
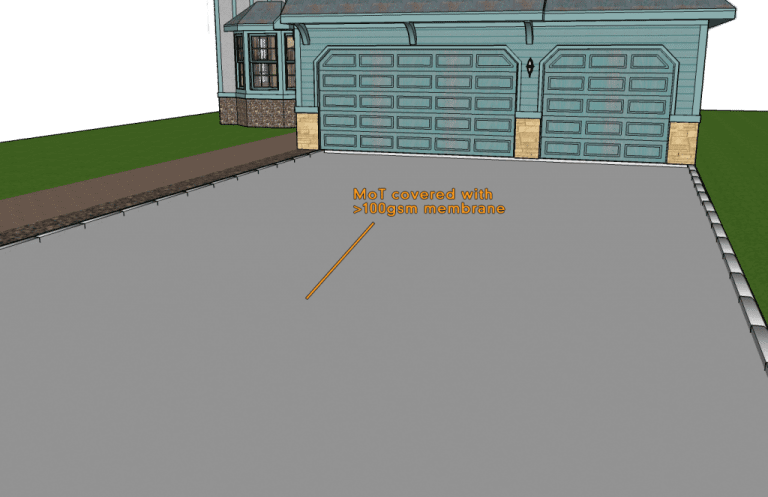
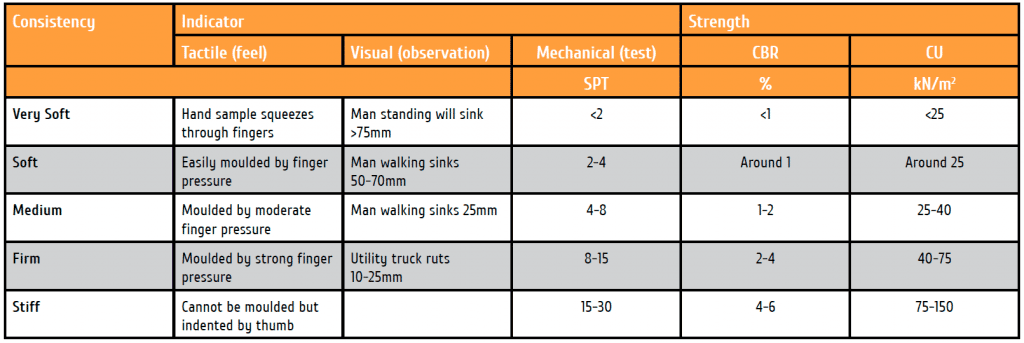
In order to work out the required depth of MoT type 3 to install as a sub-base, you must first calculate the CBR value of the existing soil present at the proposed site. Use the below table to indicate the stiffness of the ground before using the table to determine the sub-base thickness required.

Sub-base Depth

The MoT type 3 hardcore sub-base depth will vary from project to project dependent on the volume and weight of the traffic using the surface as well as the ground stiffness.

See the table below to work out the required sub-base depth, for determining the CBR value of the existing sub-grade soil please refer to the table “Sub-grade Strength/Ground Condition”.
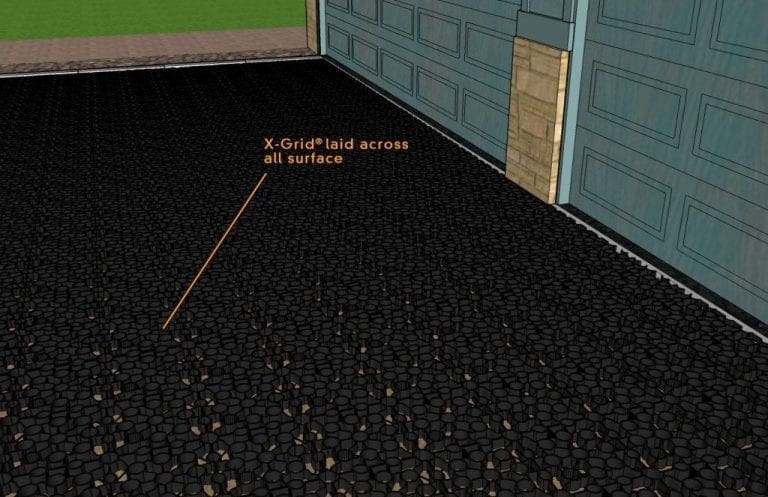
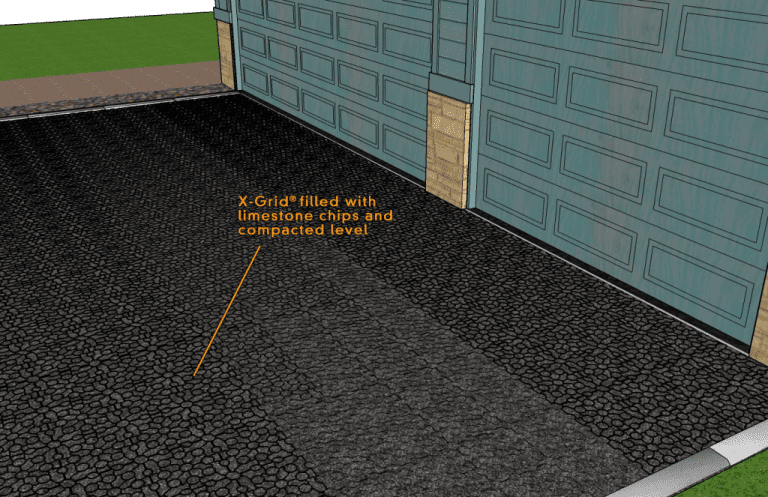
X-Grid Fill

If using X-Grid® as a sub-base layer in place of a tarmac or concrete base, the grid should be filled with a suitable and appropriate medium to provide maximum stability and durability of the installation.

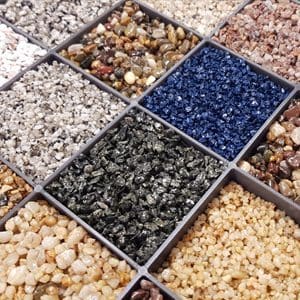
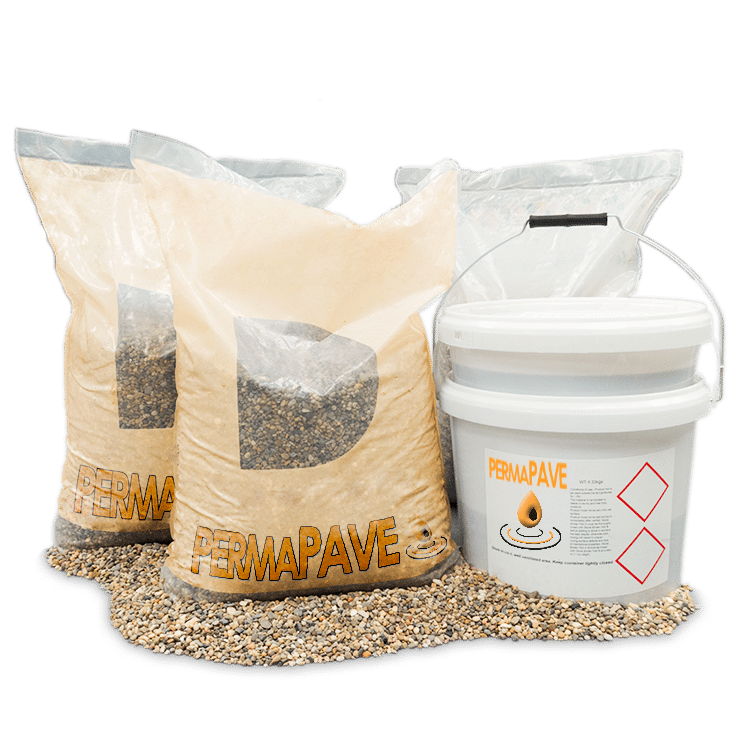
We recommend filling the X-Grid® with angular gravel with a stone diameter of up to 20mm. Limestone chippings are a cost effective and suitable choice for the fill, however it can be substituted for another material which meets this criteria.

Once the grid has been filled, we highly recommend the use of a vibrating plate compactor (whacker) to consolidate the gravel and help the X-Grid® to bed into the sand layer below.

If you are in any doubt regarding your choice of grid-fill material, please seek advice from our helpful and knowledgeable team.

Preparing Existing Base

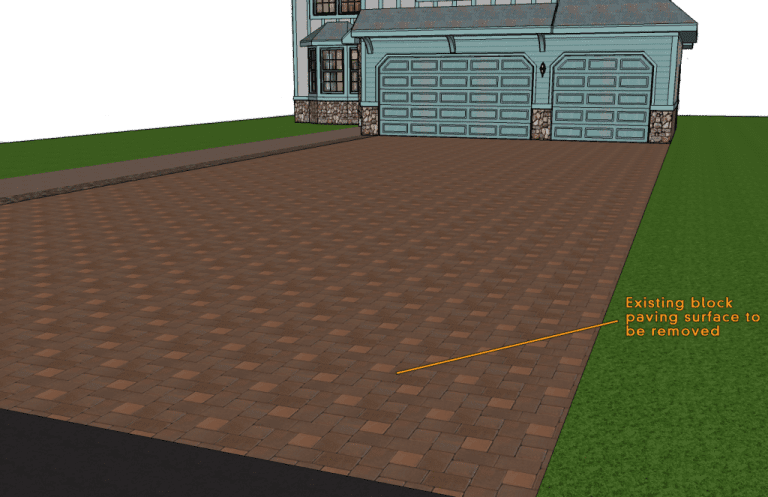
If installing onto an existing concrete or tarmac base then there is a little work to be done to ensure that the base is sound and suitable for use.

Firstly, the surface should be carefully inspected for cracks, crumbling, algae, weeds and other debris. If cracks are present then these should be cut into a ‘V’ shape to prevent the crack from reflecting upwards into the resin surface.

Porous or open grade concrete surfaces should be coated with a primer product in accordance with the manufacturer’s instructions to enable a cohesive bond with the resin and to prevent degradation.

Spreading Rates Table
Sub-grade Strength Table
Sub-base Depth Table
V-cut to reduce reflective cracking